


A DIY paver driveway can slash your costs by 30-40% compared to professional installation, but you’ll invest 7-14 days of intensive labor handling 50-80 pound pavers and operating plate compactors. Here’s the catch: base preparation mistakes cause nearly 90% of paver failures, meaning your DIY project might last only 3-5 years versus 20+ years for professional work. Understanding the true cost breakdown and skill requirements will help you determine if the savings justify your sweat equity.
Breaking Down the True Cost of DIY Paver Installation
When you’re planning a DIY paver driveway, understanding the full cost breakdown prevents budget blowouts mid-project. Materials represent your biggest expense at $10, $70 per square foot, with concrete pavers running $8, $20 and natural stone climbing to $60. Your aesthetic considerations directly impact pricing, brick pavers at $10, $45 offer timeless appeal, while budget-friendly concrete delivers durability.
Base preparation costs $2, $5 per square foot, covering excavation, gravel substrate, and bedding sand. Don’t overlook equipment rentals: wet masonry saws, plate compactors, and mortar boxes add up quickly. Climate impact affects material selection too, freeze-thaw cycles demand proper base depth and joint sand specifications. Keep in mind that these estimates reflect basic work in readily serviceable conditions, so specialty requirements or challenging site access will increase your total investment.
For a single-car driveway (240, 350 sq ft), expect material costs between $2,400, $12,000, eliminating labor’s typical 50% markup. Professional installation of a small paver driveway measuring 1,000 square feet or less typically runs $9,000, $14,000, which helps put your potential DIY savings into perspective. At the high end, cobblestone paver driveways can reach up to $75,600, making the cost difference between material choices even more dramatic for DIY planners.
Professional Installation Pricing and What You Get for Your Money
When you hire a pro, you’re looking at $50, $100/hour for labor or $5, $15/sq ft just for installation work, on top of material costs that run $10, $30/sq ft depending on your paver selection. That puts a standard 600 sq ft driveway at $15,000, $34,000 all-in, covering excavation, base prep, paver laying, jointing sand, and edge restraints. Beyond the turnkey installation, you’re also paying for warranties and quality guarantees that protect your investment if settling, shifting, or drainage issues crop up down the road. If individual pavers become damaged over time, they can be easily replaced without tearing up the entire driveway. Professional contractors also understand that proper site preparation, including excavation and leveling, is crucial for ensuring your driveway’s long-term durability and appeal.
Labor and Material Costs
Professional installation pricing for paver driveways runs $20, $35 per square foot in markets like San Diego, though national averages sit between $10, $30 per square foot depending on your region and specs.
Your paver materials selection drives a significant portion of costs. Concrete pavers run $8, $15 per square foot, brick pavers hit $10, $20, and natural stone options like granite or travertine push $15, $30. Material alone ranges $2, $30 per square foot before anyone touches a plate compactor. Cobblestone pavers represent the premium tier, ranging from $18, $50 per square foot for those seeking old-world aesthetic appeal.
Labor productivity estimates account for $9, $15 per square foot, with rates running $50, $100 hourly. Complex herringbone patterns and tight access bump labor toward the higher end. A 4, 6 person crew typically completes an 800 square foot driveway in 3, 4 days, though slopes, drainage work, and site conditions extend that timeline and increase your total investment. Driveways typically price higher than patios because they require deeper base preparation and vehicle-load specifications that demand more material and labor. Site challenges like uneven ground, water drainage issues, or tree roots may require additional prep work that adds to your final cost.
Warranties and Quality Guarantees
Beyond labor rates and material costs, warranty coverage separates legitimate contractors from fly-by-night operators. Professional installers typically back their workmanship for 2-25 years, covering settling, shifting, drainage failures, and base material defects. Top-tier contractors extend coverage to 25 years, a clear indicator of installation confidence.
You’ll also receive manufacturer transferable warranties on materials. Belgard and Unilock offer lifetime limited coverage against cracking, breaking, and fading that transfers to future owners if you sell.
Understanding warranty limitations protects your investment. Coverage excludes natural disasters, vehicle overloads, de-icing salt damage, and repairs by unauthorized contractors. Poor maintenance or alterations void your protection entirely. Reputable contractors also exclude damage from acts of God, animal destruction of edging, and unauthorized removal or alteration of pavers from their warranty terms. Some specialized contractors like Bella Rosa Pavers and Turf LLC provide warranties covering sub-base preparation and settling issues exceeding specific thresholds.
Budget contractors offering 1-2 year warranties provide minimal long-term security. When evaluating quotes, factor warranty length into your cost-per-year calculation, extended coverage often justifies premium pricing.
Essential Tools and Equipment for Laying Your Own Pavers
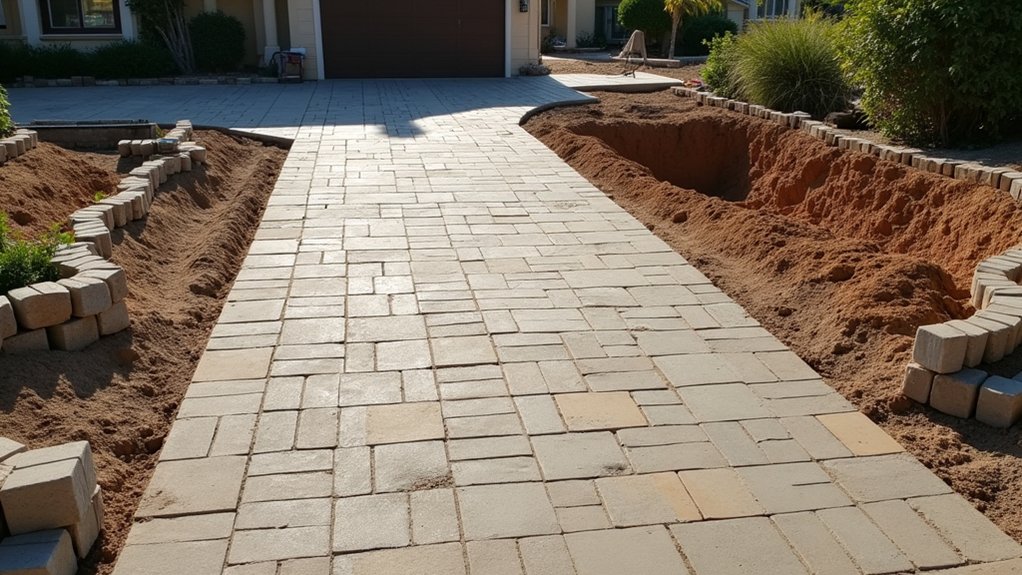
Before you break ground on your paver driveway project, you’ll need to assemble the right arsenal of tools and equipment to handle each phase of installation. Efficient excavation methods require shovels, pickaxes, and wheelbarrows, though larger projects benefit from skid steers or excavators for surface removal. Plan to excavate to a minimum depth of 15 inches to accommodate the necessary base layers.
Base preparation demands a plate compactor delivering 3,000+ lbs of force for proper subgrade consolidation. You’ll need string lines, 4-foot levels, and 8-10 foot screeding boards to establish slope and create flat bedding surfaces. For larger projects or establishing slope over long distances, a leveling laser provides superior accuracy compared to traditional methods.
Specialty cutting tools required include diamond-blade saws or paver splitters for clean edge cuts around obstacles. Finish work calls for rubber mallets, push brooms for polymeric sand application, and edging installation tools to lock everything in place. Consider installing PVC conduit beneath your paver driveway during construction to simplify adding irrigation or landscape lighting in the future without tearing up your finished work.
Time Commitment Required for a Complete Driveway Project
How long will your paver driveway project actually take from first shovel to final compaction? Your timeline depends heavily on total project complexity and square footage. Small driveways under 1,100 square feet typically require 5 working days, 1-2 days for prep, 1-2 days for installation, and 1 day for cleanup.
Small paver driveways under 1,100 square feet typically take 5 working days from excavation to final compaction.
Medium projects spanning 1,100-2,000 square feet demand 7 working days. You’ll spend 2 days on removal and base prep, 2-3 days laying pavers, and 1-2 days on debris removal.
Large driveways exceeding 2,000 square feet stretch to 7-10 days minimum. Expect 3-4 days for excavation, another 3-4 days for installation, plus 2 days for cleanup. During this extended timeline, you’ll need to arrange parking accommodations and coordinate with any other contractors working on your property.
Your homeowner experience level substantially impacts these estimates. Weather delays and site conditions can extend timelines beyond standard projections. Plan accordingly.
Physical Demands and Skill Level Needed for Success
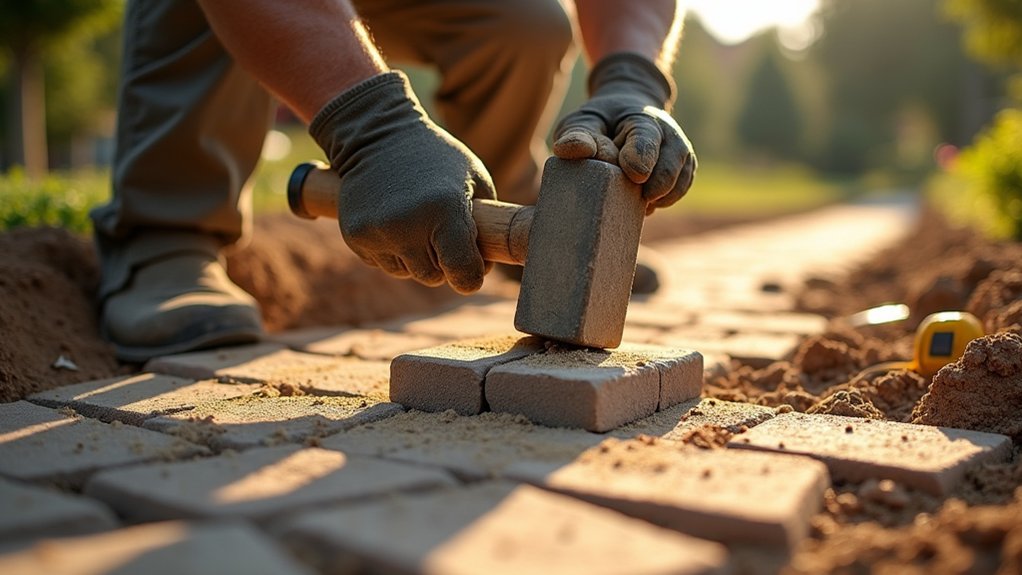
Most DIY enthusiasts underestimate the sheer physical toll a paver driveway extracts from your body. You’ll excavate 7-9 inches of soil, wrestle a 10,000 lb force plate compactor, and handle pavers weighing 50-80 pounds each, all while bending and kneeling for hours.
Physical skill development requirements include:
- Operating mechanical compactors through minimum three passes per layer
- Calculating precise 2% slope grades for proper drainage
- Achieving exact 1-inch bedding course thickness using screeds
- Evaluating subsoil drainage properties and frost movement potential
Ergonomic considerations matter greatly. You’re not just lifting, you’re performing repetitive motions across multi-day work sessions. Technical proficiency in base preparation, edge restraint installation, and compaction verification separates successful projects from costly failures.
Comparing Durability Between DIY and Professional Results
When you’re comparing DIY results to professional work, base preparation quality is where most projects succeed or fail. Your edge restraints need proper installation to prevent lateral movement, which directly impacts how long your pavers stay locked in place. Understanding these structural fundamentals helps you evaluate whether your skill level can deliver the long-term integrity a driveway demands.
Base Preparation Quality Matters
Nearly 90% of paver failures trace back to one critical factor: base preparation quality. You’ll need proper grading techniques and suitable geotextile selection to prevent aggregate mixing with clay subsoils. Professionals calibrate base depth to your specific soil conditions, while DIY installations often miss these critical adjustments.
Here’s what separates lasting driveways from premature failures:
- Excavation depth: Clay subsoils demand 8-12 inches removal before compaction
- Base thickness: Driveways require 8-12 inches of crushed aggregate versus 6 inches for patios
- Compaction method: Each layer needs plate compactor passes with water misting to lock particles
- Final verification: Your finished base shouldn’t show visible movement under foot traffic
Skip any step, and you’re building on a foundation destined to shift.
Edge Restraint Installation Differences
Your base preparation determines long-term stability, but edge restraints keep that investment locked in place, and this is where DIY and professional approaches diverge markedly.
For residential installation considerations, you’ll typically use plastic restraints with 10-inch spikes driven every 8-12 inches. Curves require cutting the back web every third hole. You must cover plastic with sand or gravel to prevent sun-induced warping, a critical step many DIYers overlook.
Professionals employ direct-fastened systems using explosive charges or drilled anchor bolts into concrete bases. They’ll trowel reinforced concrete sections for driveways handling vehicular braking and turning forces.
The potential durability drawbacks of DIY installations stem from improper spike spacing, insufficient depth in loose soils, and uncovered plastic warping over time. Professional concrete restraints deliver permanent stability that plastic simply can’t match under heavy loads.
Long-Term Structural Integrity
Because edge restraints anchor your pavers at the perimeter, the materials you’ve selected and how you’ve installed them ultimately determine whether your driveway survives five winters or fifty.
DIY installation shortcuts compound over time, triggering predictable failure modes:
- Base settlement, Inadequate compaction causes sinking and uneven surfaces within two seasons.
- Joint deterioration, Improperly filled joints promote weed infiltration and paver migration.
- Freeze-thaw damage, Lower-grade pavers crack when moisture penetrates and expands.
- Edge creep, Weak restraints allow perimeter pavers to shift under vehicle loads.
Professional installations combat these issues through commercial-grade compaction equipment, pro-grade materials with higher compressive strength, and precision techniques. You’re looking at 10-20+ years of structural stability versus DIY’s typical 3-5 year lifespan before major repairs become necessary.
Long-Term Maintenance Expectations for Paver Driveways
While paver driveways offer exceptional durability compared to poured concrete or asphalt, they’re not maintenance-free installations. You’ll need to establish consistent cleaning routines, weekly sweeping and monthly pressure washing, to prevent moss, algae, and stain penetration.
Paver driveways deliver superior durability, but consistent cleaning routines are essential to prevent moss, algae, and stubborn stains.
Joint sand integrity demands attention every one to two years. When rain and traffic wash out polymeric sand, you’ll notice paver shifting and weed infiltration. Replenishing sand maintains surface stability and prevents structural issues.
Sealing frequency depends on traffic levels: high-traffic driveways require resealing every two to three years, while moderate-use areas can extend to four years. You’ll want penetrating sealers for longevity or film-forming options for color enhancement.
With proper maintenance protocols, quality pavers deliver 25 to 50 years of service life.
Making the Final Decision Based on Your Budget and Goals
How do you reconcile your vision for a premium paver driveway with the financial realities of your project? Start by matching material selection to your budget threshold and custom aesthetic potential.
Consider these decision factors:
- Material tier selection: Concrete pavers at $10-$20 installed offer budget friendly options, while natural stone at $25-$50 delivers luxury appeal.
- Size-to-cost ratio: Your 600 sq ft double-car project runs $6,000-$18,000 DIY versus $15,000+ professionally installed.
- Time valuation: Factor 7-14 days of labor against 30-40% savings.
- Longevity ROI: Higher upfront investment yields 25-75+ year lifespan with $15-$125 individual paver repairs.
Your final decision hinges on balancing immediate costs against long-term value and your willingness to invest sweat equity.
Frequently Asked Questions
Can I Install Pavers Over My Existing Concrete or Asphalt Driveway?
Yes, you can install pavers over your existing concrete driveway if the slab’s structurally sound without major cracks. You’ll need proper subbase installation using sand or crushed stone as a leveling layer over the concrete. Choose your paver laying patterns carefully during the planning phase to guarantee alignment at edges and shifts. Don’t skip drainage evaluation, poor water management causes long-term damage. This overlay method saves significant demolition costs while improving curb appeal.
Do I Need a Permit to Install a Paver Driveway Myself?
You’ll likely need a permit to install a paver driveway yourself, especially if you’re connecting to a public road or making significant changes to your property’s layout. Permit requirements vary widely, so check your local zoning regulations by contacting your city or county building department. They’ll clarify whether your project scope triggers compliance obligations. Don’t skip this step, securing proper permits prevents costly fines, verifies your installation meets code, and safeguards your property value long-term.
What Weather Conditions Should I Avoid When Installing Driveway Pavers?
You’ll want to avoid installing during heavy rain, as water accumulation creates an unstable fluid cushion beneath your pavers and compromises base compaction. Similarly, avoid installing during winter freeze, temperatures below 32°F cause polymeric sand joint failure and prevent proper asphalt binding. Skip extreme heat above 75°F too, which hinders curing and affects sand setup. High humidity days also interfere with material setting, so check your forecast before breaking ground.
How Do Paver Driveways Affect My Home’s Resale Value?
Paver driveways can boost your home’s resale value by 5, 10%, adding $5,000, $20,000 to your property’s worth. You’ll see increased curb appeal that makes buyers notice your home immediately. The improved property aesthetics signal a well-maintained residence, helping homes sell 7, 10 days faster. With a 70, 80% ROI and 20, 25 year lifespan, pavers outperform asphalt and concrete for long-term value retention.
Are There Eco-Friendly Paver Options That Help With Stormwater Management?
Yes, you’ll find excellent eco-friendly options that deliver real stormwater management benefits. Permeable pavers made from recycled materials, like post-consumer HDPE plastic or reclaimed concrete, allow stormwater infiltration directly through the surface into aggregate base layers below. This system filters pollutants, reduces runoff volume by up to 90%, and recharges groundwater naturally. You’re fundamentally mimicking the natural water cycle while meeting Low Impact Development standards and Clean Water Act compliance requirements.