


Start your driveway repair by systematically inspecting for cracks, potholes, and drainage issues to document all damage. Next, you’ll pressure wash the surface and apply degreasers to remove contaminants. Then categorize and fill cracks while undercutting pothole edges for proper patching material compaction. Level any uneven sections using mudjacking for concrete or overlay for asphalt. Finally, apply an appropriate sealer during dry conditions to protect against environmental damage. These foundational techniques establish the framework for understanding advanced repair methodologies and material specifications.
Inspect and Assess Damage
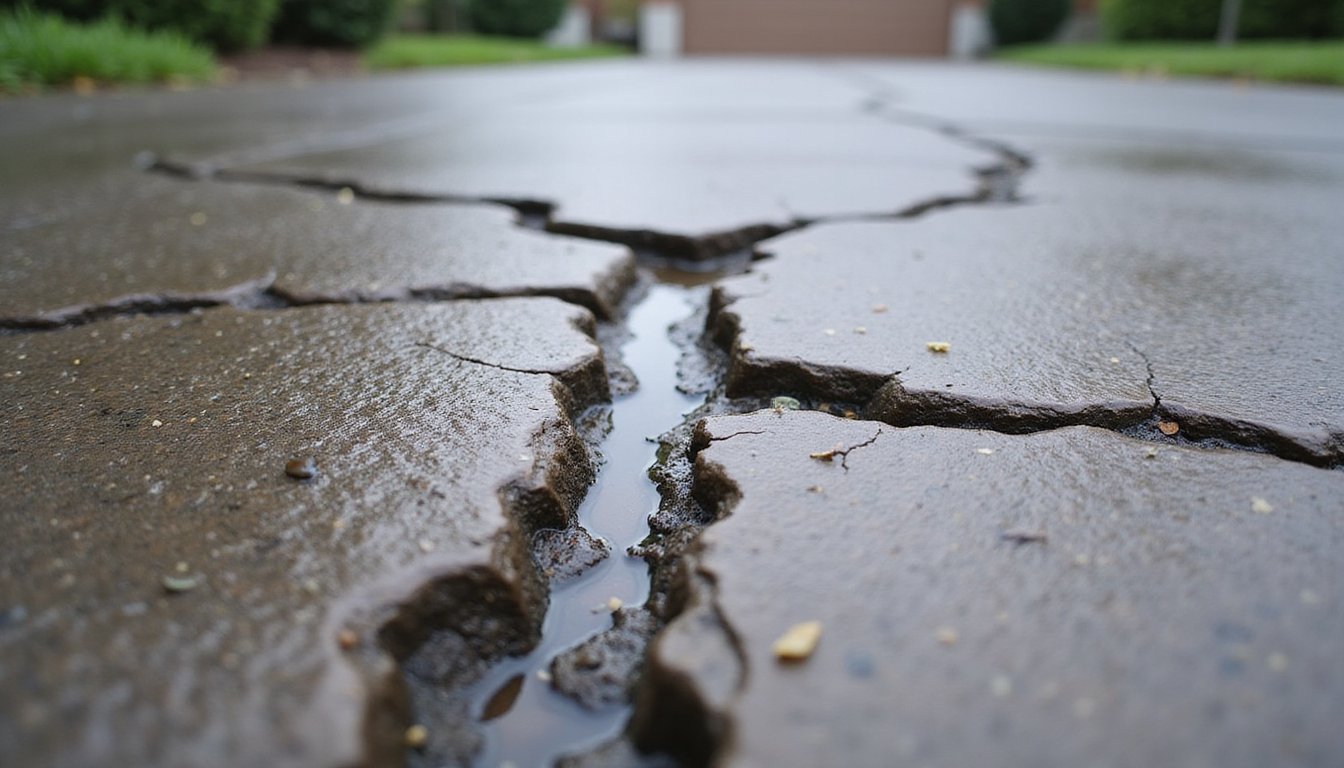
Before attempting any driveway repair, you must conduct a systematic inspection of the entire surface to determine whether the damage warrants patching or full replacement. Document all cracks, potholes, and depressions, noting whether damage affects less than 25% of the total area, the threshold for cost-effective repair versus full replacement. Examine the underlying base condition by identifying soft spots, subsidence, or widespread alligator cracking that indicates sub-base failure. Perform a drainage assessment by checking for standing water, erosion patterns, and verifying minimum 2% slope with ¼-inch-per-foot crown. Measure crack widths: hairline versus greater than 1 inch. Evaluate material type and age; driveways exceeding 25, 30 years with substantial damage typically require replacement. Monitor for poor drainage patterns, surface cracking, and weakened structural integrity during your inspection to prevent future complications. Consider that UV exposure and extreme weather can accelerate deterioration beyond normal aging patterns, weakening the foundational integrity of your driveway surface. Look for signs of freeze-thaw damage, where water infiltration into cracks expands during freezing temperatures and causes progressive concrete deterioration. Professional assessment becomes necessary when structural faults penetrate deeper layers beyond surface-level deterioration.
Thorough Cleaning and Prep
Once you’ve completed your damage assessment and determined that repair remains viable, cleaning the driveway surface becomes the foundation for successful material adhesion and long-term durability. Start by using leaf blowers to prevent dust dispersion while removing loose debris, leaves, twigs, and dirt. Follow with stiff-bristled brushes along edges to ascertain proper drainage channels remain clear. Apply degreasers to oil stains and mold-specific cleaners to organic growth before pressure washing. Use appropriate nozzle settings and maintain 6, 12 inch distance from the surface during systematic, overlapping passes. Rinsing thoroughly eliminates detergent residues while pre-wetting the surface initially helps loosen embedded surface dirt for more effective cleaning. Allow complete drying in sunny, low-humidity conditions before proceeding with repairs. Protect nearby areas like sidewalks and landscaping with cardboard or plastic sheeting to prevent cleaning solution overspray. For stubborn grease stains, employ absorbent substances like kitty litter to extract the grease before sweeping and applying a specialized degreaser. Wear safety goggles, gloves, and closed-toe shoes throughout all cleaning operations.
Crack and Pothole Repair
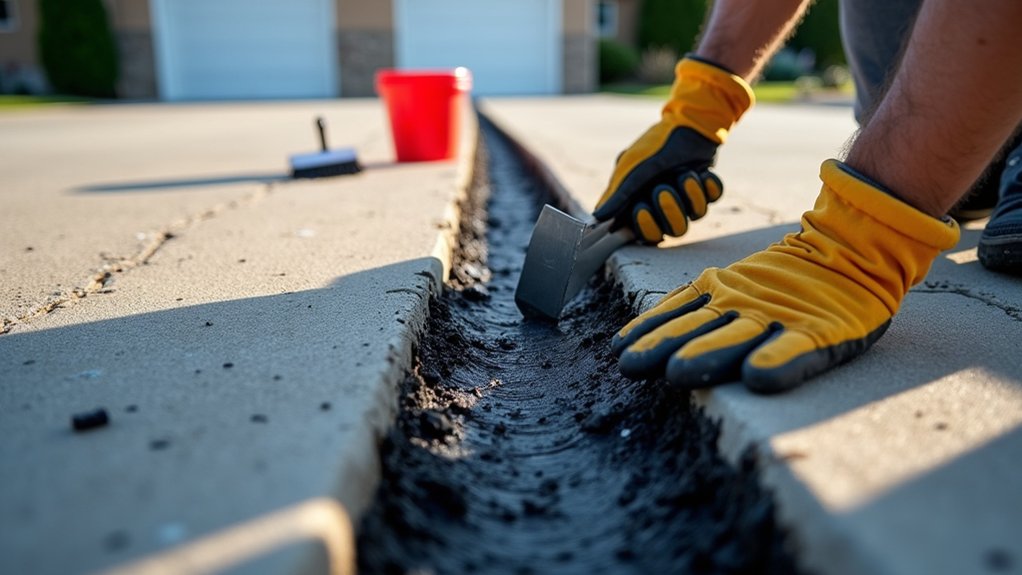
After preparing a clean, dry surface, you’ll need to identify and categorize cracks by width, depth, and activity level to determine the appropriate repair methodology. Cracks under 1/4 inch require cold-pour fillers, while larger structural failures demand hot-pour rubberized or epoxy compounds. Active cracks necessitate flexible filler application to accommodate thermal movement and prevent premature failure.
For effective repairs:
- Remove all loose debris using wire brushes and air compressors to guarantee maximum adhesion
- Slightly overfill cracks to compensate for material shrinkage during curing
- Undercut pothole edges and compact patching material with a tamper for structural integrity
- Apply edge sealant to bond patches and prevent water infiltration
Maintain seasonal repair maintenance schedules, addressing new damage before winter freeze-thaw cycles accelerate deterioration and compromise your driveway’s structural foundation. For asphalt driveways, use specialized BLACKTOP Asphalt Filler products designed specifically for the material’s unique properties and flexibility requirements. Wearing protective goggles and gloves during all repair work protects against debris and chemical exposure from fillers and sealants. Check for settlement cracks that may indicate underlying ground shifting, as these require addressing the foundation issue before surface repairs will be effective.
Level and Finish Repair
When your driveway exhibits uneven settling, depressions, or raised sections that compromise both functionality and safety, leveling becomes essential before surface finishing can proceed. Begin by thoroughly cleaning the surface and marking high and low spots with chalk. For concrete slabs, drill injection ports at 2.5, 3 foot intervals to distribute leveling material evenly, either cement slurry via mudjacking or polyurethane foam through polyjacking. Monitor slab height during lift using levels and repeated measurements to prevent overcorrection and cracking. Asphalt driveways require overlay application with proper compaction. Understanding that soil movement from moisture changes, temperature fluctuations, and heavy vehicle loads commonly cause these surface irregularities helps inform the appropriate repair approach. After achieving target elevation, trowel or screed the surface for uniformity, then patch all injection holes with repair compound. Verify proper drainage slope, inspect for remaining depressions, and allow appropriate curing time before vehicular use.
Seal and Protect Surface
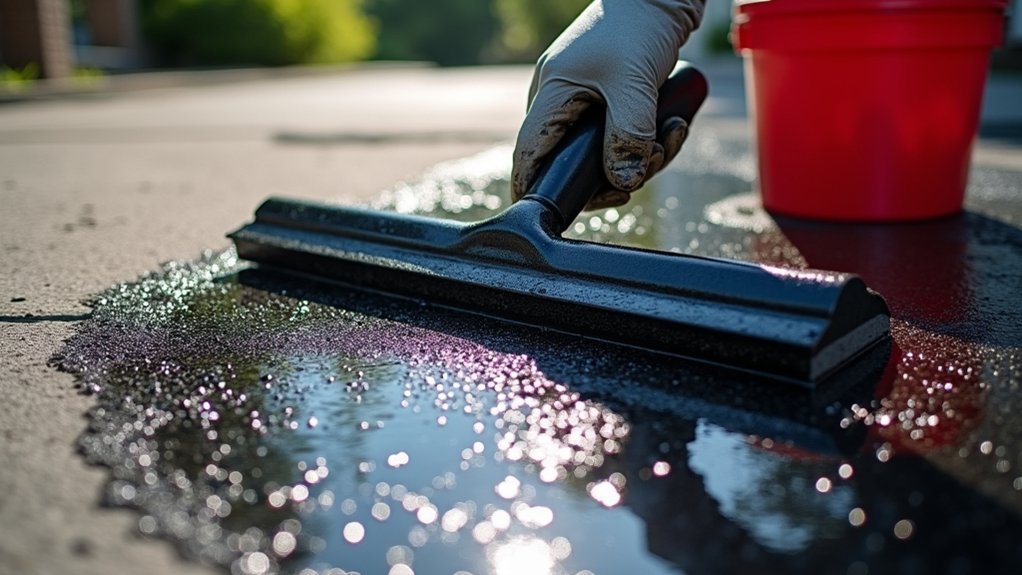
Following successful leveling and structural repairs, sealing the driveway surface provides the critical barrier that protects your investment from environmental degradation and extends service life by years or even decades. Proper sealer application techniques require thorough surface preparation: pressure wash to remove all contaminants, allow complete drying, and verify ambient temperatures exceed 50°F before proceeding.
Sealing creates a protective barrier against environmental damage, extending your driveway’s lifespan by years when applied to properly prepared surfaces.
Select appropriate sealer chemistry for your climate and traffic conditions:
- Penetrating silane/siloxane for freeze-thaw resistance
- Polyurethane for chemical hardening and deicing salt protection
- Reactive silicates for permanent pore-filling durability
- Coal tar emulsions for asphalt oil resistance
Apply thin, even coats using rollers or squeegees during dry weather forecasts. Avoid epoxy coatings as they trap moisture vapor and degrade under UV exposure. Driveway sealers play an essential role in shielding against damaging elements that compromise asphalt integrity over time. Film-forming sealers can provide a glossy sheen to enhance your driveway’s finished appearance. Observe sealer safety precautions: guarantee adequate ventilation, wear respiratory protection with solvent-based products, and choose low-VOC formulations when possible.
Frequently Asked Questions
What Safety Equipment Should I Wear During Driveway Repair Work?
You’ll need essential PPE including safety goggles to shield your eyes from flying debris and concrete dust, and protective gloves to guard against sharp edges and chemical exposure. Wear steel-toed boots for foot protection, a properly fitted respirator or N95 mask to filter harmful fumes and particles, and high-visibility clothing on active sites. Don’t forget chemical-resistant gloves when handling sealants and crack fillers, ensuring compliance with safety standards throughout your repair work.
How Much Does DIY Driveway Repair Typically Cost Compared to Hiring Professionals?
DIY driveway repair saves you $3, $7 per square foot in labor costs but requires your time investment. You’ll spend $20, $40 on asphalt repair kits or $0.10, $5 per square foot for concrete materials, versus professionals charging $1,000, $4,000 for typical repairs. However, you’ll need equipment rentals ($200, $500 daily) and accept quality risks. Small crack repairs offer maximum DIY savings, while larger structural work often justifies professional expertise and warranties.
What Weather Conditions Are Best for Performing Driveway Repairs?
You’ll achieve favorable results performing driveway repairs during dry weather with mild temperatures between 65, 75°F. Guarantee surface and air temps remain above 50°F for at least 24 hours post-application to allow proper curing. Avoid working during rain, high humidity, or when temperatures exceed 90°F, as these conditions compromise material adhesion and bonding. Late spring through early fall provides the most consistent conditions, maximizing your repair’s structural integrity and durability.
Can I Drive on My Driveway Immediately After Completing Repairs?
No, you can’t drive on your driveway immediately after repairs. You’ll need to wait a minimum 72 hours for asphalt or 7 days for concrete to guarantee proper curing duration. Premature traffic flow impact causes permanent indentations, cracking, and structural weakness. Weather conditions directly affect cure times, heat accelerates hardening while cold and moisture extend waiting periods. For code-compliant results, restrict all vehicle access during the full recommended interval, even though foot traffic’s permissible after 24, 48 hours.
How Long Does a DIY Driveway Repair Typically Last?
Your DIY driveway repair typically lasts 1, 5 years, depending on proper material selection and application quality. Asphalt patches generally survive 1, 5 years, while concrete repairs reach 2, 5 years. You’ll achieve better long-term durability by selecting high-grade materials, addressing subsurface issues, and maintaining a 2, 3 year sealing schedule. Climate conditions and traffic loads dramatically impact performance. For structural integrity beyond 5 years, you’ll need full resurfacing or professional intervention.